- Logbook
- FLIGHT
- Block PAYLOAD | PAX | FUEL USED | PLANNED FUEL | FPR
- AIRPORT DELAY and QFU
- ATC ROUTE
- GLOBAL DELAY STAT
- PERFS STATS
- AUTO UPDATE FLIGHT TIMES (Single flight)
- ACARS Capture
- COSMIC RADIATION
- AIRCRAFT
- FROM-TO AIRPORTS
- TIMES
- AIRPORT STATUS PRO
- DL
- STAND
- RUNWAY IN USE
- APPROACH
- FUNCTION ON BOARD
- TAKEOFF and LANDING
- OPS Data
- REMARK / PROFICIENCY CHECK
- JUMPSEATS
- DETAILS
- ACTIONS
Logbook #
All your flights are displayed under My Flights tab.

- airline logos are automatically displayed according to your flight number.
- on large screen devices you can see how many take-off and landing you made per flight.
- color badges show your delay (ON TIME, 5MIN, -15MIN, +15MIN)
- a magnify icon is used to filter displayed flights. You can search ALL within your database (crew name, tail number, flight number, personal note.. please note it’s case sensitive, and need 3 chars minimum).
- AF ONLY : les retours clients apparaissent sur la droite (étoiles)
ACTIONS #
- PULL DOWN : update flight times (see below)
- PULL UP : load and display next flights
- SLIDE LEFT : delete flight
- DELETE button : delete flights by bulk
- MONTH button : display selected month flights
- TODAY button : display Today’s flights
- + button : add a new flight
AUTO UPDATE FLIGHT TIMES #
No more need to log your times !
- Enable this option in Settings.
- Pull down the flight list page will update flight times : OOOI (OUT-IN-OFF-ON) times for all available flights, parking stand, and also tailnumber if empty.
- O O O I will be updated within 7 days of your flights.
- O – – I will be updated within 45 days of your flights.
- after 45 days, flight times will not be updated.
FLIGHT #
By taping on a flight title bar, you open the concerned flight window.
You MUST fill OUT OFF ON IN times so as your flight can considered as done and count toward the total flight time.

In case you have allowed in settings the Long Haul Multi Crew option, you should have these fields showing as soon as you have edited the OOOI times.

All fields are editable :
Block PAYLOAD | PAX | FUEL USED | PLANNED FUEL | FPR #

By taping on a field it will show up a calculator helping filling values. For planned fuel, you can add values from your OFP (TRIP fuel, TAXI IN and OUT) and by pressing OK it will convert the TOTAL from kg to t. (You can also fill values directly in t).
Filling these values calculate :
- tkm/L which is payload x distance / fuel burn
- paxkm/L which is pax x distance / fuel burn
- tCO2 which is the total CO2 emitted (Greenhouse gases emission for Jet A/A1 and also CO2 emitted in petrol extraction). By taping this field you’ll have a popup with these two values differentiated.
- filling both planned and burnt fuel consumption will display the difference flight by flight, and cumulated (see TOTALS & STATS)
AIRPORT DELAY and QFU #
PRO
By taping the ATC tower icon  , you can display the current airport global delay situation (based on 60 last flights delayed from and to airport), and a map showing current traffic around, allowing to check which runways are in use.
Departure 3 – Arrival 4 means app found 3 departing traffic and 4 arriving.
6/6 means the number of frames (limited to 6)

ATC ROUTE #
By taping the FPR button you can enter or edit your ATC Route (WPT) to display your route with any maps (wind, aurora, atlas etc…)
GLOBAL DELAY STAT #

By clicking this icon, a popup shows the global statistical delays for this flight number. This icon appears only if you have AUTO UPDATED your flight time (see below)

PERFS STATS #
You can choose to include/exclude this flight from your performance on-time stats.
AUTO UPDATE FLIGHT TIMES (Single flight) #
No more need to log your times !
- Enable this option in Settings.
- Pull down the flight list page will update flight times : OOOI (OUT-IN-OFF-ON) times for all available flights, parking stand, and also tailnumber if empty.
- O O O I will be updated within 7 days of your flights.
- O – – I will be updated within 45 days of your flights.
- after 45 days, flight times will not be updated.
See also ACARS Capture
ACARS Capture #
iOS
FlightLog grabs the OOOI (OUT, OFF, ON, IN) hours from the ACARS display, using OCR (Optical Character Recognition) technology, on-the-fly, even with no network.
Hit the ACARS button, scan your ACARS screen with your camera to fill block hours.

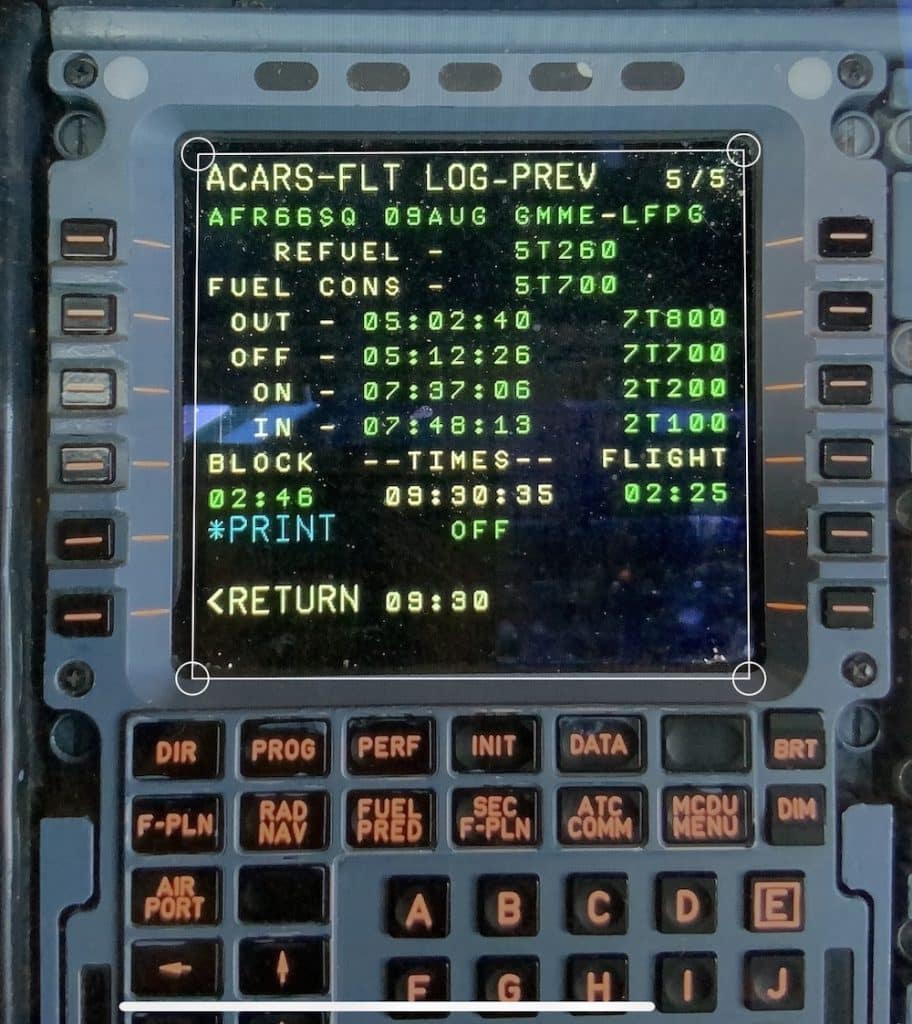
Then check block hours. Hours in green means the hours have been checked with the available block time / flight time. In red it means the scanned hours don’t fit block/flight times. You can edit one by one if needed and hit USE HOURS to fill flight data, or just close the window.

In case your ACARS screen is not recognized, just send us the picture.
COSMIC RADIATION #
Calculate your received cosmic radiation (see Cosmic Radiation) by :
- Fill your OFF and ON time (air flight time only is concerned, not block time)
- Tap on Cosmic Radiation field
- Enter your first and last Flight Level if any step climb
- Tap on green check icon
see Cosmic Radiations Calculator for deeper explanation.
AIRCRAFT #
Add an Aircraft #

Click on AIRCRAFT field and select your aircraft in the dropdown list. If your tail doesn’t appear, press the + icon and add a new tailnumber. You can also use the search bar on top to help you finding your aircraft.

Find your aircraft PRO #
ANDROID : May have unexpected resultsIt’s also possible to locate your aircraft like Flightradar24.


- fill your tailnumber
- click on the right button
- the app will use the ADS-B network to find where is your aircraft and will display the inbound flight and ETA.
See also Locate an Aircraft
FROM-TO AIRPORTS #
Edit airports #
You can change your origin and destination by taping the airport fields.
Airport personal Warning notes #
By taping the shield icon, you’ll open a popup where you can fill personal notes for the concerned airfield. Each flight with this airfield will fetch your notes. (Orange when note existing, light grey if not)
Weather forecast PRO #
Sunrise/Sunset time PRO #

By taping this icon you’ll open a popup where you can display the calculated sunrise/sunset and moonrise/moonset times. The times are precalculated as the popup window shows, with scheduled flight time.
Then you can choose between SCHED / GPS / MANUAL.

SCHED #
Explained above (use scheduled flight time regardless of actual takeoff time or speed)
GPS #
Uses your device’s GPS data. If no location acquired, the system uses values Alt.30000ft / Spd 400kts.
MANUAL #
This is the more accurate way to compute the sunrise time.

- Select a WPT (use ‘*’ key to have 5 digits e.g. PATOX or **PGS)
- Choose your FL
- Select your Ground Speed
- Fill your WPT ETA.
- hit CALCULATE
The computation is running, between your position (or WPT) and destination, flying along a Great Circle, or if any is inserted, along your ATC route. The sunrise position and time will be displayed on the map. Tap on the event to see details. Track in black is night, yellow is day. The calculation is taking into account the altitude and speed of course, but also the atmosphere refraction.
Weather Radar PRO #
By taping the button WEATHER SAT within the SUNRISE window, you’ll access to a map showing your flight and weather radar image animated. At the bottom you’ll find a range index you can grab to animate time range (10min per step).
Aurora chances of viewing PRO #
By taping the button NORTHERN LIGHTS within the SUNRISE window, you’ll access to a map showing your flight (Great Circle or ATC Route if entered) and your chances of seeing an aurora.
ANDROID : May have unexpected resultsYou can display your chances to see auroras along your flight (great circle or ATC Route if entered)
There are actually 2 zones : PREDICTIVE aurora according to your take off time, and ACTUAL CONDITIONS, more consistant if you have WiFi on board. Predictive areas are not fully reliable as auroras events can be accurately planned 3 hours before.
PREDICTIVE: ![]()
ACTUAL : ![]()

The current Kp is the planetary index calculated by the NOAA.
iOS
By taping on Show 3D Earth you will display a full 3D map.

WINDS PRO #
REMOVED Due to satellite data shutdown
by taping on SUNRISE icon then ATMOSPHERE button you’ll see your flight plan within a WINDS map. Your flight is truncated into several segments for which a best ground speed FL is computed, taking into account all winds at FL between FL230 and FL500. You can display different FL.
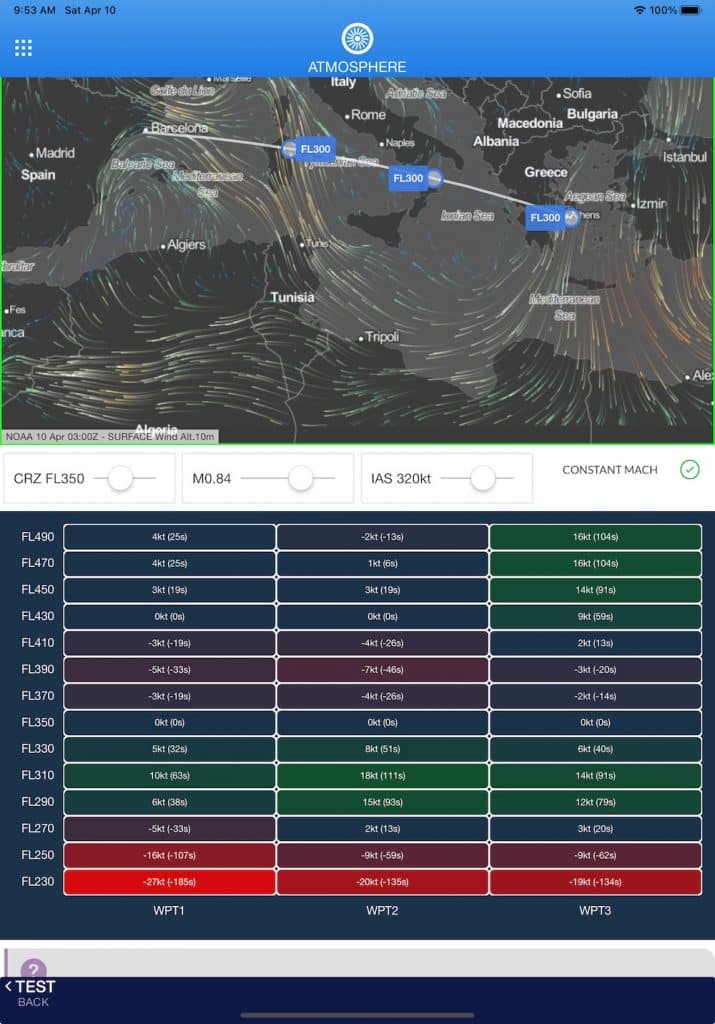
Select your FL, Mach and IAS. IAS is the speed under conversion. GS will be calculated with winds at all levels, at selected Mach with local pressure and temperature. Mach is considered as constant ; if you are flying with Cost Index, just deselect CONSTANT MACH (selected Mach will be used as reference, but computing is not so accurate as Mach can vary along cruise).
You can read the delta speed and the delta flight time in sec.
If you have previously inserted a planned trip fuel value, the array will also display a delta fuel consumption based on difference with optimum FL (these are trend values, to give an idea of the overconsumption, do not use for operational).
TIMES #
Here you can edit your OOOI flight times : OUT – OFF – ON – IN.
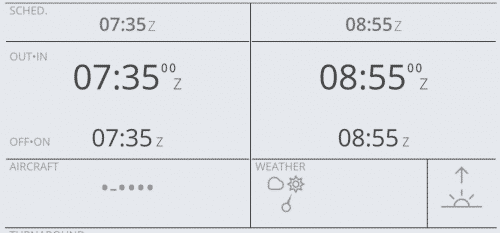
By taping on any TIME field you’ll edit the value. Taxi time and flight time (airborne and block) are automatically computed.
Average delay for this flight number are available by clicking on the update icon (see below).
NIGHT #
Night flight time is automatically computed. You may also edit it by clicking on it.
There is actually two methods :
- Distance < 300Nm : night time is computed using sunrise and sunset times in OUT airfield minus 30min.
- Distance > 300Nm : night time is computed by looking for sun position for each point of Great Circle route between OUT and IN airfields.
AIRPORT STATUS PRO #

By clicking these icons you’ll access to the general Airport delay Status. You may know by this way if you are likely to hold on destination (or departure).
DL #
Here you can insert your DL code. Below will be displayed the IATA signification. By taping on this title, you’ll have a popup where you can see the full description of the DL code.

The DL codes are also used in STATS page.
STAND #
Insert here your arrival stand. Parking stands are used in STATS page where you can see all stands used, by airport.
RUNWAY IN USE #
You can insert here your RWY used for Takeoff and Landing. These informations are also used in STATS page.
Add NEW RWY #
If RWY is missing you can add and manage your own runways. Tap on +ADD NEW RWY and fill orientation. Press STORE to save then back to the flight : your new created runway should be available.


APPROACH #
Select your type of approach. Selecting CATIII/II will set your flight as automatic landing.
FUNCTION ON BOARD #
Select your function on board (PIC, SIC, PICus, INS…). Selecting SIC, PICus, SPIC or DUAL will display the field NAME PIC required for EASA PDF export. Your flight time is then dispatched in PDF right column (PIC SIC DUAL INS)
INSTRUCTOR SIGNATURE #
By selecting SIC / SPIC / PICus or DUAL will display NAME PIC field. By clicking on it you can edit the Instructor name and also a signature pad will show to get his signature. The signature will show on PDF logbook export.


TAKEOFF and LANDING #
![]()
Here you can select how many takeoffs and landings you performed.
NIGHT LANDING #
(requested by FAA) Night landing is automatic. Adding a landing will check if sun is 6 deg below horizon or not at landing time on destination. If you need to manually force night landing true or false, just tap on “Landing” title. A moon icon is shown if night landing is true.
OPS Data #
iOS
By allowing it in Settings, you can see a new field with 3 buttons. FROM airport DATA, DESTINATION airport DATA, and a REPORT button.
![]()
Please refer to OPS Data section.
REMARK / PROFICIENCY CHECK #
![]()
- Here you can save your personal notes according to a particular flight.
- If you activate the Proficiency Check tick, it will open new fields to be filled (instructor name and signature)
JUMPSEATS #
This is a CPT tool to manage your jumpseat requests, ahead of your flight.
![]()
Tap on the field to open the popup window :

Then you can add (+) a new JPS, delete or edit (swap to the left) and also sort your JPS.
> When entering a new JPS, a local notification will remind you 50min before flight (you have to allow notification prompt)
DETAILS #
DETAILS field is generally used to report your crew names. Tap on the field to edit.
ACTIONS #

By pressing the [•••] button you’ll display a contextual menu (aka action sheet) with several actions :
- Next Leg : you will be redirect to New Flight page with pre-filled data (airports, date, crew, aircraft etc)
- Return Flight : you will be redirect to New Flight page with pre-filled data (airports, date, crew, aircraft etc)
- Duplicate : you will be redirect to New Flight page with pre-filled data (airports, date, crew, aircraft etc)
- Lock Flight : your flight will be locked i.e you won’t be able to edit data unless unlock it (same action than lock button)
- Cancel Flight : your flight will be considered as cancelled (it remains in your logbook but won’t be included in flight totals and PDF export)
- iOS Share Flight : you can send a flight, to your copilot for example, for his logbook, via Airdrop, SMS, WhatsApp, Mail etc…
- Swap to General Aviation Flight (Commercial Flight) : acts as title, swap the flight’s type.
- Delete Flight : your flight will be deleted (same action as the delete button). It’s also possible to delete multiple flights by once by clicking the trash button at the very bottom of flights list.
